


 A dead battery happens to almost everyone at least once, and when it does, you’ll want to know how to jump start a car. If you don’t do it correctly, you could end up damaging your vehicle’s engine. Follow these basic steps to safely jump start your car’s battery.
Step 1: Park the Car With the Working Battery Close to the Front of Your Car
The best position for jump starting your car is for the vehicle with the working battery to park nose-to-nose with your car, with the front bumpers almost touching. You want to get as close as possible so the jumper cables will reach from the good battery to your dead one. Of course, if your battery is in the rear of your car, park nose-to-rear-bumper instead.
Step 2: Identify the Battery Terminals
The terminals of your battery are the points to which you will connect the jumper cables. One is marked with a + (positive) sign and the other is marked with a – (negative) sign. Your positive terminal will likely be covered by a rubber cap, which you will need to remove before connecting the cables.
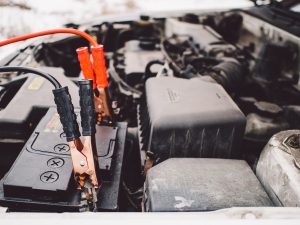
Step 3: Connect the Cables to the Battery Terminals
This is the most critical step. Your cables are color-coded red and black to correspond with the positive (red) and negative (black) terminals. Be sure the metal clamps at the end of the cables don’t touch each other. Place the red clamp onto the dead battery’s positive terminal and set the black clamp onto a plastic component of your vehicle. Attach the red clamp on the other end of the cable to the positive terminal of the good battery.
Attach the black clamp on that same end of the cable to the negative terminal of the good battery. Return to your car, but do not attach the black clamp to the dead battery’s negative terminal. Instead, attach it to a nearby, bare-metal bolt. Attaching the clamp to the battery could cause it to spark and ignite into a fire. Check that all clamps are tight by wiggling them to ensure they do not come off their positions.
Step 4: Start the Engines
Ensure that the cables are not tangled in any moving parts, then start the car with the good battery. Allow it to run for a few minutes to provide a small charge to your car’s battery. Attempt to start your car. If it still won’t start, turn off your car and wait another 10 minutes or so, then try again. If it doesn’t start this time, your battery is probably beyond repair and you’ll need to replace it.
Step 5: Remove Jumper Cables
Once your car does start, leave it running. Disconnect the jumper cables by first removing the black clamp on the bare-metal bolt. Then, remove the red clamp from your car’s positive terminal, making sure the ends never come close to touching. Place both ends on the ground before disconnecting the red clamp from the good battery’s positive terminal, then the black clamp from the negative terminal.
Step 6: Have Your Battery Inspected
After you get your car running and fully charge the battery, bring it in to a service shop to have it inspected. Factory-trained technicians will be able to tell you if the battery is still good or if that or another part of your vehicle (like the alternator) needs to be repaired or replaced.
A jump start is hard on your battery, so you should only do it if you absolutely have to. However, always bring your car in to be checked out after a jump start. Contact Glasscock Chevrolet to schedule your battery inspection today.
Image courtesy of pixabay.com
Connect with us

